 E-submission
 TOTA
TOTA TOTS
TOTS
Articles
- Page Path
- HOME > J Musculoskelet Trauma > Volume 25(3); 2012 > Article
-
Original Article
- Combined Anterolateral and Lateral Approaches in Treatment of Extra-articular Fracture of the Distal Humerus
- Dae Gyu Kwon, M.D., Kyoung Ho Moon, M.D., Ph.D., Suk In Na, M.D., Byung Ki Shin, M.D., Tong Joo Lee, M.D., Ph.D.
-
Journal of the Korean Fracture Society 2012;25(3):185-190.
DOI: https://doi.org/10.12671/jkfs.2012.25.3.185
Published online: July 16, 2012
Department of Orthopedic Surgery, Inha University School of Medicine, Incheon, Korea.
- Address reprint requests to: Tong Joo Lee, M.D., Ph.D. Department of Orthopedic Surgery, Inha University Hospital, 27, Inhang-ro, Jung-gu, Incheon 400-103, Korea. Tel: 82-32-890-3043, Fax: 82-32-890-3047, tjlee@inha.ac.kr
• Received: March 23, 2012 • Revised: April 22, 2012 • Accepted: May 9, 2012
Copyright © 2012 The Korean Fracture Society
- 1,224 Views
- 11 Download
- 2 Crossref
Abstract
-
Purpose
- The purpose of this study was to analyze the clinical effectiveness of open reduction in the treatment of distal humeral fracture using a newly designed combined approach of anterolateral and lateral approaches to protect the radial nerve.
-
Materials and Methods
- We investigated 24 consecutive cases of distal humeral fracture who received open reduction and internal fixation with a plate and screws with a minimum follow-up period of 1 year. We analyzed the patients' age, sex, fracture pattern, timing of the union, range of motion of the elbow joint, and complications. The Mayo elbow performance index (MEPI) was employed for the assessment of elbow joint function.
-
Results
- Clinical union was observed at 10.8 weeks (6~20 weeks) on average. Pre-operatively, there were 3 cases of incomplete radial nerve palsy. All of the cases recovered, and there was no additional radial nerve palsy due to surgery. According to the MEPI, 13 cases were "excellent" and 10 cases were "good" or better, comprising 95.83% of the cases. The range of motion at the elbow was 5.5 degrees (0~15 degrees) of extension, and 131.5 degrees (120~145 degrees) of flexion, suggesting no functional disability. The duration of return to work was 11.2 weeks (5~32 weeks) on average. There were no nonunion, malunion, or infection complications.
-
Conclusion
- The combined anterolateral and lateral approach we designed is a clinically effective approach due to facilitation of protection of the radial nerve and attainment of adequate fixation space.
- 1. Cooney WP. Evarts CM. Humeral fractures: operative treatment, complication, and reconstruction surgery. In: Surgery of the musculoskeletal system, 1990;Vol. 2:2nd ed. New York, Churchill Livingstone. 1633-1600.
- 2. Dabezies EJ, Banta CJ 2nd, Murphy CP, d'Ambrosia RD. Plate fixation of the humeral shaft for acute fractures, with and without radial nerve injuries. J Orthop Trauma, 1992;6:10-13.
- 3. Henry AK. Extensile exposure, 1973;2nd ed. New York, Churchill Livingstone. 25-37.
- 4. Holstein A, Lewis GM. Fractures of the humerus with radial-nerve paralysis. J Bone Joint Surg Am, 1963;45:1382-1388.Article
- 5. Hoppenfeld S, Deboer P. Surgical exposures in orthopedics. The anatomic approach, 2009;4nd ed. Philadelphia, Lippincott. 73-110.
- 6. Jupiter JB. Complex non-union of the humeral diaphysis. Treatment with a medial approach, an anterior plate, and a vascularized fibular graft. J Bone Joint Surg Am, 1990;72:701-707.Article
- 7. Mills WJ, Hanel DP, Smith DG. Lateral approach to the humeral shaft: an alternative approach for fracture treatment. J Orthop Trauma, 1996;10:81-86.Article
- 8. Swanson TV, Gustilo RB. Gustilo RB, Kyle RF, Templeman DC. Fracture of the humeral shaft. In: Fracture and dislocation, 1993;St. Louis, Mosby. 365-385.
- 9. Thompson JE. Anatomical methods of approach in operations on the long bones of the extremities. Ann Surg, 1918;68:309-329.Article
- 10. Wang JP, Shen WJ, Chen WM, Huang CK, Shen YS, Chen TH. Iatrogenic radial nerve palsy after operative management of humeral shaft fractures. J Trauma, 2009;66:800-803.Article
- 11. Yildirim AO, Oken OF, Unal VS, Esmer AF, Gülçek M, Uçaner A. Avoiding iatrogenic radial nerve injury during humeral fracture surgery: a modified approach to the distal humerus. Acta Orthop Traumatol Turc, 2012;46:8-12.Article
REFERENCES
Fig. 1Cross-sectional image of combined anterolateral and lateral approach. Level 1: Anterolateral approach of proximal humerus: Surgical dissection was made through the midportion of the brachialis muscle. Note the radial nerve between the brachialis muscle and brachioradialis muscle in cross section C. Level 2: Anterolateral approach of midshaft of the humerus. Level 3: Lateral approach of the distal humeral shaft: Surgical dissection is made between the triceps muscle and lateral intermuscular septum. B: Brachialis muscle, Bc: Biceps brachii muscle, Br: Brachioradialis muscle, Tc: Triceps brachii muscle.


Fig. 3
A 21-year-old man sustained the fracture in an accident.
(A) An initial radiograph shows a spiral fracture of the distal humerus.
(B) A radiograph after operation shows anatomical reduction and alignment by open reduction and internal fixation with a plate and lag screw.
(C) Follow-up radiography 1 year after operation shows good bony union of the fracture without complications.

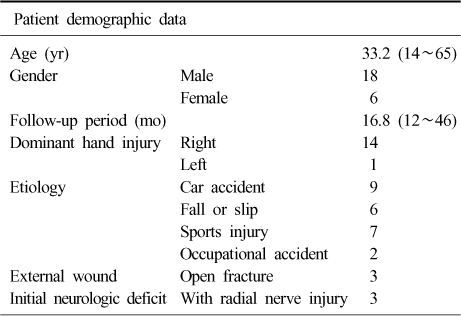
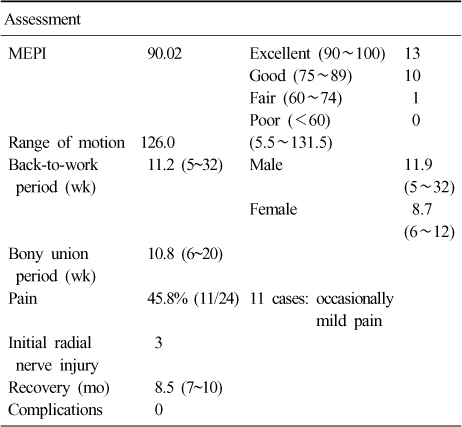
Figure & Data
REFERENCES
Citations
Citations to this article as recorded by 
- Posterior Dual Plating for Distal Shaft Fractures of the Humerus
Chul-Hyun Cho, Kwang-Yeung Jeong, Beom-Soo Kim
Journal of the Korean Fracture Society.2017; 30(3): 117. CrossRef - Modified Combined Approach for Distal Humerus Shaft Fracture: Anterolateral and Lateral Bimodal Approach
Tong Joo Lee, Dae Gyu Kwon, Suk In Na, Seung Do Cha
Clinics in Orthopedic Surgery.2013; 5(3): 209. CrossRef
 Cite
CiteCombined Anterolateral and Lateral Approaches in Treatment of Extra-articular Fracture of the Distal Humerus
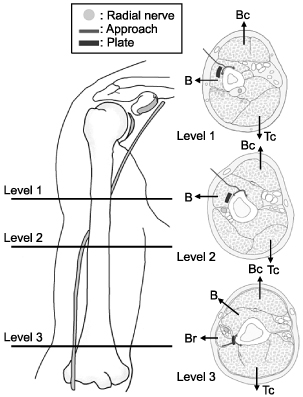
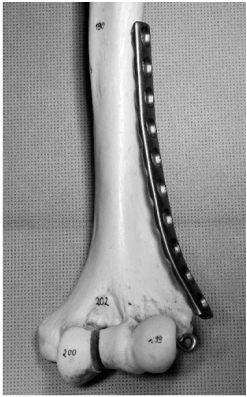

Fig. 1
Cross-sectional image of combined anterolateral and lateral approach. Level 1: Anterolateral approach of proximal humerus: Surgical dissection was made through the midportion of the brachialis muscle. Note the radial nerve between the brachialis muscle and brachioradialis muscle in cross section C. Level 2: Anterolateral approach of midshaft of the humerus. Level 3: Lateral approach of the distal humeral shaft: Surgical dissection is made between the triceps muscle and lateral intermuscular septum. B: Brachialis muscle, Bc: Biceps brachii muscle, Br: Brachioradialis muscle, Tc: Triceps brachii muscle.
Fig. 2
A ten-hole plate bending with the contour of the distal humeral shaft.
Fig. 3
A 21-year-old man sustained the fracture in an accident.
(A) An initial radiograph shows a spiral fracture of the distal humerus.
(B) A radiograph after operation shows anatomical reduction and alignment by open reduction and internal fixation with a plate and lag screw.
(C) Follow-up radiography 1 year after operation shows good bony union of the fracture without complications.
Fig. 1
Fig. 2
Fig. 3
Combined Anterolateral and Lateral Approaches in Treatment of Extra-articular Fracture of the Distal Humerus
Patient demographic data
Values are presented as number or range.
Result of combined approach
MEPI: Mayo elbow performance index.
Table 1
Patient demographic data
Values are presented as number or range.
Table 2
Result of combined approach
MEPI: Mayo elbow performance index.

